The Way to Use Plants and Trees to Create Your House Sustainable.

The motion to convert preexisting homes into more sustainable variants of these will be gaining steam. The majority of the attention is on the type of windows, doors or solar panels to opt for or what type of laundry device you need to put in, and not enough men and women realize you may have a sizable influence on your home's sustainability with plants and trees! That said there's still a massive amount of info on the market, so we're here in order to supply you with the fast take.

Follow These Several Steps to a Beautiful Garden.

Beginning a backyard is among the most rewarding things you can do. Whether you are planting fragrant florals or beginning a vegetable garden, However, it can be tricky to know where to get started. Our measures facilitate you into gardening and also reward you for your attempts with lovely visuals, yummy flavors, and vibrant blooms.

1.Consider Your Choices

In the event you decide on veggies or herbs for their gifts to your own dinner table, determine which ones your household will eat or is prepared to attempt. If you'd like flowers for their own flair, color, and aroma, choose whether you would like annuals that bloom the majority of the summer but have to be replanted every spring or perennials which have a shorter blossom period but return every year. All are legitimate options but have different care requirements. 1 piece of advice: Start small until you understand what you are getting into.

2.Select the Correct Spot

Virtually All vegetables For this reason, you have to observe your lawn through the day to determine which spots get full sunlight versus semi or complete colour. Do not despair if your lot is mainly shady. You won't have the ability to grow berries in colour, but many different crops (e.g., ferns and hostas) enjoy it. This measure is very important to make sure that your plants possess their light needs fulfilled so that they can flourish. Assess plant labels or ask the staff at the regional garden center that will assist you understand how much sunlight a plant needs.

Three additional hints: Decide on a relatively flat place for your backyard since it is harder, time-consuming, and costly to take care of a sloping backyard. Assess for windbreaks (e.g., your home or your neighbor's home ) which will keep plants out of being damaged by powerful winds. And place the backyard where you can not dismiss its pleas for care --out the rear door, close to the mail box, or from the window that you gaze throughout while you wash your hair. Bonus if this area is close enough to a water spigot you won't need to drag a hose into the hinterlands.

Eliminate the sod Covering the region you intend to plant. If you'd like rapid results (e.g., it is already spring and you also would like veggies that this summer), cut it away. Slice beneath the sod using a scoop, cut the sod into segments to make it simpler to eliminate, then place it on your compost pile to decompose.

It is easier to smother The bud with paper, however, it takes more. (Quite simply, you should begin the collapse before spring planting.) Cover your upcoming backyard with five sheets of paper; double that number in case your yard is Bermuda grass or St. Augustine grass. It is going to take about four weeks for the paper and compost to decompose. However, by spring, you will have a bed prepared to plant--no weeds or grass and a good deal of rich dirt.

3.Improve the Soil Friable the dirt, the greater your veggies will grow.

The same is true for different plants. Invariably, residential land requires a boost, particularly in new building where the topsoil might have been stripped off. Your soil might be overly moist, poor and sterile, or overly acidic or alkaline. The answer is often simple: Insert organic matter. Insert a two - to 3-inch layer of mulch, decayed leaves, dry grass clippings, or older mulch into the ground when you dig till a fresh mattress (see Step 5). In case you opt not to dig are working with a proven mattress, make the organic matter on the surface at which it will eventually rust into humus. Earthworms will do the majority of the job of blending humus in together with the subsoil.

They will direct you through the process: just how much dirt to ship from which regions of the garden and also the ideal time to acquire samples. Anticipate a wait for those findings, that will let you know exactly what your soil lacks and how to correct it.

4.Work the Soil There are two approaches: tilling and digging.

Tilling includes cultivating soil Using a mechanical device like a rototiller. This is a great method if you want to incorporate considerable quantities of alterations. But, it may also irritate germs and earthworms. Excessive tilling, functioning dirt when it is too dry or wet, damages soil structure and plant roots.

Digging is more Practical for preparing little beds. Walking on ready beds compacts the soil, so lay down planks briefly to disperse your weight.

5.Pick Your Plants.

Some individuals pore over Catalogs for weeks; many others visit the backyard and purchase what wows them. Either way works provided that you select plants adapted to a Climate, soil, and sun. You can even browse the Web for plants To buy.

How to make a butterfly house

Do your bit to Encourage our indigenous butterflies by supplying. Them having a great house and a fantastic food supply. By creating a butterfly house, you may have some family fun and make a safe area for exquisite butterflies, then settle back and appreciate.

Regrettably, our indigenous butterflies are under severe threat. Four Butterfly species have become extinct within the past 150 decades and 75 percent of British butterfly species have been in decline because of habitat reduction, raising amounts of pollution and altering weather patterns. As a sign for biodiversity, the reduction of butterflies highlights a larger problem in our normal world.

It is more important than ever to make an area for butterflies inside our houses and green spaces.

By planting nectar-rich blossoms like buddleia, lavender, French Marigold and Michaelmas daisy, or supplying a butterfly home you're certain to attract butterflies in your garden.

Construct your own butterfly home On front, made to mimic the breaks in the bark of a tree. You might discover that butterflies will utilize the home to shelter from bad weather and predators in addition to for breeding and feeding.

Creating a butterfly home Is Simpler than you think, particularly with Our step-by-step instructions. But, it's crucial that children are fully supervised when creating the butterfly house and power tools are managed by an adult.

  • 1.Using a tape measure, carefully draw the Parts of the butterfly home on the wood with the following measurements<
  • 2.Use the Very Same tools to pin down the roof on the top border of the sides of the home
  • 3.Repeat to the bottom of the Home
  • 4.Tug six narrow slots on the front piece of the Home, roughly 10mm x 100mm
  • 5.Drill holes at each end of this slits drawn in measure six and cut with a jigsaw or handsaw
  • 6.Locate the right branch/bark to correct within the butterfly home for the butterflies to land on. Repair with a few screws
  • 7.Drill and countersink holes at the front part of The home to be able to connect it to the sides with galvanised screws.

Put your butterfly home in a sunny but sheltered location in order it Is shielded from the end. The home ought to be located around four to six feet above the floor and rather near to nectar-rich blossoms which will work as a fantastic food source for seeing butterflies.

You Can Help attract butterflies to a own butterfly house by Painting the exterior of it using brightly colored flowers (utilizing non-toxic paint) or simply by including a coating of bark to make it seem more like a shrub.

    Alternately, lure butterflies to the home using a sugar alternative:
  • This can help dissolve the sugar completely
  • Put a fresh sponge on a little dish and pour onto the sugar so It's about half complete
  • Set the dish sponge at the butterfly home
  • Assess the solution every day to make sure it's not becoming mouldy
  • Store any leftover sugar alternative from the refrigerator
  • Learn more tips and tips about attracting butterflies to your backyard
  • Encouraging other wildlife into your backyard
  • You can start Your garden up into other wildlife by integrating log piles and foliage Clutter for hedgehogs.

Decorate the Top of a Cabinet

Before you choose to show something up high, stop and pause for a minute to assess why, precisely, you need to do as such. An excessive number of individuals imagine that whenever a rack is in sight there should be something laying on head of it.
As kitchen cabinets Pittsburgh, PA explained, if we set objects up there, do you perceive how they would have diverted the eye from the island and those gutsy light installations? In the field of velvety white, the extras would have stuck out and pointed out themselves.
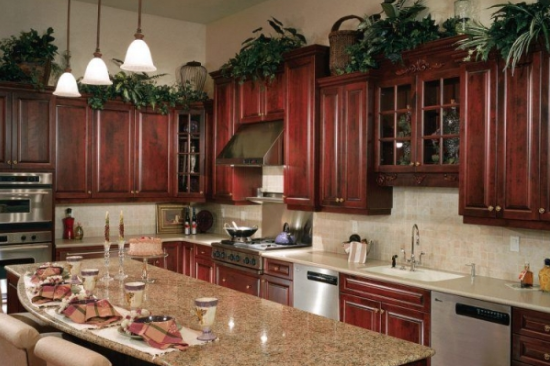
This kitchen was redesigned with new completes and another island, however we left the edge cabinets. Nowadays, we generally take cabinets to the roof or if nothing else higher than this, so my motivation here was to mix the cabinetry with the divider shading so these more seasoned cabinets didn't stick out or get took note.
Maybe the developers didn't get the update that in case you're going to raise the roof, the cabinets and different components need to go as well!
On the off chance that your bureau is genuinely short - suppose around 5' or 6' high and it looks route shorter than the roof. On the off chance that it kind of shouts out for something to be placed above it - that is alright, you can design it
Truly, there are a couple of approaches you can take while designing over a bureau.
Along these lines, to ensure one of them truly works for you, you initially need to decide whether you have the correct space for what you need to set up there and on the off chance that you have the correct accomplices to carry out the responsibility.
On the off chance that you do, you would then be able to start to address your bureau enlivening as follows.
Are your roofs truly elevated? Is there so much vertical space between the roof and your cabinets that the room looks vacant and incomplete?
Ordinarily a shelf, or cabinet, or the kitchen cabinetry feels excessively squatty in a room. This is an example when you have to let your stylistic layout things outwardly expand the tallness of the household item or the cabinets.
On the off chance that you put any things up there, they should be enormous and massive. Bigger, bolder objects ought to consistently be utilized on the off chance that you'll be seeing them a good ways off.
What we're attempting to do here is expand the visual stature of the piece, so it seems taller.
At the point when you have a truly astounding assortment of something, and you ridiculously, truly need individuals to see it, showing what you have over the cabinetry can be proper.
Keep in mind: Quantity is your companion in this circumstance. You're making a visual even band or outskirt, sort of like a cornice or structural frieze or something to that affect, which must be practiced with bunches of redundancy of shape and worth.
Another motivation to put something on head of a bureau is to simply finish it off, to give an enhancing adornment or structural piece that is absent from the bureau. A twist.
Having stylistic layout things on head of a bureau that mix with the divider can give you the capacity and show space you want, and they won't command the scene or cause everything to appear to be cumbersome.
Balancing work of art on the divider over a bureau basically does likewise as the various recommendations I've referenced here, anyway the item is level and holds tight the divider as opposed to sitting on head of the bureau.